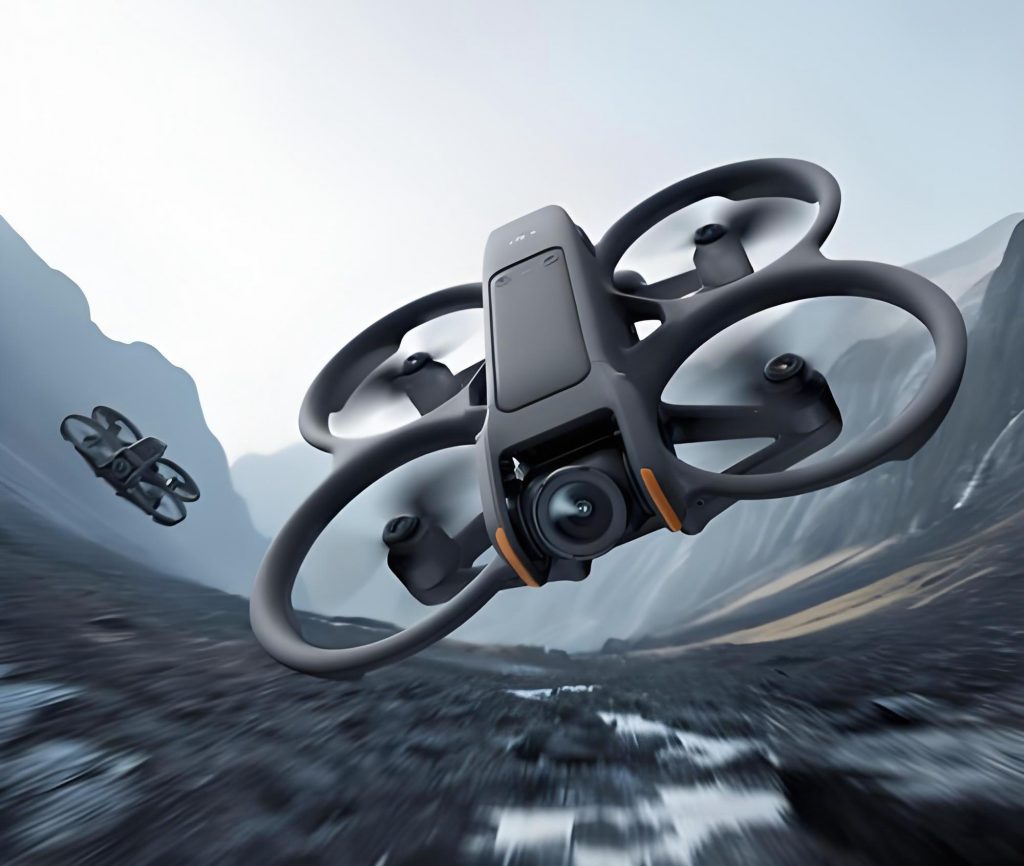
As an avid enthusiast of aerial photography, I recently had the opportunity to upgrade to the latest DJI UAV, the Mavic 3 Pro, and I must say, the experience has been nothing short of revolutionary. Having used the previous model, the Mavic 3, for over a year, I was eager to explore the enhancements in this new iteration. The DJI drone market has always been dynamic, but the introduction of a triple-camera system in a consumer-grade UAV like the Mavic 3 Pro marks a significant leap forward. In this detailed account, I will share my firsthand experiences, focusing on the technical specifications, imaging capabilities, and overall performance, while incorporating tables and formulas to provide a structured analysis. Throughout this review, I will emphasize key terms such as DJI UAV, DJI drone, and DJI FPV to highlight the ecosystem’s breadth.
The most striking feature of the new DJI Mavic 3 Pro is its triple-camera setup, which sets it apart from its predecessor. The primary camera remains similar to the old Mavic 3, featuring a Hasselblad lens with a 24mm equivalent focal length, a 4/3-inch CMOS sensor with 20 million effective pixels, an aperture range of F2.8 to F11, a shutter speed from 8 to 1/8000s, and a focus range from 1 meter to infinity. This consistency ensures that users familiar with the previous model will find the core imaging capabilities reliable. However, the addition of a medium telephoto camera and an upgraded telephoto camera transforms the DJI drone into a versatile tool for various shooting scenarios.
To better illustrate the differences, I have compiled a table comparing the camera specifications of the new Mavic 3 Pro and the old Mavic 3. This table not only highlights the advancements but also serves as a quick reference for potential users.
| Camera Type | Equivalent Focal Length | Optical Zoom | Sensor Size | Effective Pixels | Aperture | Shutter Speed | Focus Range |
|---|---|---|---|---|---|---|---|
| Primary Camera (Both Models) | 24mm | N/A | 4/3-inch CMOS | 20 MP | F2.8-F11 | 8-1/8000s | 1m to ∞ |
| Medium Telephoto (Mavic 3 Pro Only) | 70mm | 3x | 1/1.3-inch CMOS | 20 MP / 48 MP | F2.8 (Fixed) | 2-1/8000s | 3m to ∞ |
| Telephoto (Mavic 3 Pro Upgraded) | 166mm | 7x | 1/2-inch CMOS | 12 MP | F3.4 (Fixed) | 2-1/8000s | 3m to ∞ |
| Telephoto (Old Mavic 3) | 162mm | 7x | 1/2-inch CMOS | 12 MP | F4.4 (Fixed) | 2-1/8000s | 3m to ∞ |
From this table, it is evident that the new DJI UAV boasts significant improvements, especially in the telephoto camera, where the equivalent focal length has been extended from 162mm to 166mm, and the aperture has been widened from F4.4 to F3.4. This enhancement directly impacts image quality, as a larger aperture allows more light intake, which can be expressed using the formula for light gathering capacity: $$ L \propto A^2 $$ where \( L \) is the light intensity and \( A \) is the aperture diameter. For instance, with the telephoto camera’s aperture increase, the light intake improves by a factor of $$ \left( \frac{F3.4}{F4.4} \right)^{-2} \approx 1.67 $$ meaning approximately 67% more light, resulting in better low-light performance.
In terms of design, the Mavic 3 Pro features a distinct triple-camera module that makes it easily identifiable compared to the older model. The carrying case has also been redesigned; the old Mavic 3 came with a bulky backpack, whereas the new DJI drone includes a more compact shoulder bag, reducing weight and improving portability. Compatible accessories like the remote controller, batteries, propellers, charging hub, and carrying case remain the same, but items such as the storage cover, propeller guards, ND filter sets, and wide-angle lenses are not cross-compatible. This emphasizes the need for users to carefully consider their accessory investments when upgrading to this DJI UAV.
Moving on to the imaging experience, the triple-camera system offers unparalleled flexibility. The primary camera is ideal for capturing vast landscapes, the medium telephoto excels at subject-focused shots, and the telephoto is perfect for detailed close-ups. Switching between lenses is seamless—simply tapping the 1×, 3×, and 7× icons on the remote controller interface. I conducted several tests in urban environments, and the results were impressive. For example, when shooting street scenes, the primary camera delivered sharp, wide-angle views, while the medium telephoto allowed me to isolate specific elements without moving the drone. The telephoto camera, despite its smaller sensor, showed marked improvement over the old Mavic 3, with reduced noise and better clarity.
The medium telephoto camera offers two pixel storage options: 20 MP and 48 MP. While the higher resolution provides more detail for large-format prints, it also consumes significant storage space, especially when saving RAW files. The relationship between resolution and file size can be modeled as $$ S = k \times R $$ where \( S \) is the file size, \( R \) is the resolution in megapixels, and \( k \) is a constant factor dependent on compression. In practice, the 48 MP mode is beneficial for cropping and post-processing, but users should balance this with storage constraints. During my tests, I noticed minimal visual difference between the two modes in well-lit conditions, but the 48 MP option shone in scenarios requiring extensive editing.
Another noteworthy feature is the Explore Mode, which enables optical and digital zoom ranging from 1× to 28×. This mode utilizes all three cameras sequentially, with each handling a specific zoom range. The zoom functionality can be described by the formula $$ Z_{\text{total}} = Z_{\text{optical}} \times Z_{\text{digital}} $$ where \( Z_{\text{optical}} \) is the optical zoom factor (e.g., 7× for the telephoto) and \( Z_{\text{digital}} \) is the digital zoom extension. For instance, at 28× zoom, the system combines optical and digital zoom to achieve distant shots, though I observed slight stuttering during lens transitions in video mode. This is a common issue in multi-camera systems, but it does not detract significantly from the overall experience.
To quantify the image quality across different cameras, I performed low-light tests and analyzed the signal-to-noise ratio (SNR). The SNR can be approximated as $$ \text{SNR} = \frac{S}{\sqrt{S + N}} $$ where \( S \) is the signal strength and \( N \) is the noise. In my observations, the primary camera had the highest SNR, followed by the medium telephoto, and then the telephoto. This aligns with the sensor sizes; larger sensors generally perform better in low light. Here is a table summarizing the image quality in various conditions:
| Camera | Daylight Performance | Low-Light Performance | Recommended Use Cases |
|---|---|---|---|
| Primary Camera | Excellent | Outstanding | Landscapes, professional imaging |
| Medium Telephoto | Very Good | Good | Portraits, detailed scenes |
| Telephoto | Good | Fair (noise visible) | Close-ups, distant subjects |
The smart photo mode, available on all three cameras, enhances image quality by capturing multiple shots and merging them. However, it requires stable conditions and is not supported during motion or with the 48 MP mode on the medium telephoto. This mode leverages computational photography techniques, such as HDR blending, which can be represented as $$ I_{\text{final}} = \frac{1}{N} \sum_{i=1}^{N} I_i $$ where \( I_{\text{final}} \) is the merged image and \( I_i \) are the individual exposures. In my usage, this mode consistently produced sharper and more dynamic photos, making it a valuable addition to the DJI drone’s arsenal.
For video recording, the Mavic 3 Pro supports smooth zoom transitions from 1× to 28×, though the lens switches cause minor jumps. The obstacle avoidance system has been upgraded, capable of detecting objects up to 200 meters away. During one flight, I received alerts for nearby helicopters, demonstrating the DJI UAV’s advanced safety features. Additionally, the drone is compatible with DJI Goggles 2, DJI Flight Glasses, and DJI Motion Controller 2, expanding its utility for FPV-style experiences. Speaking of DJI FPV, while the Mavic 3 Pro is not an FPV model, its capabilities complement the broader DJI ecosystem, allowing users to explore creative angles similar to what one might achieve with a dedicated DJI FPV drone.
Now, let’s discuss the pricing and after-sales service. The Mavic 3 Pro is available in four versions, mirroring the old Mavic 3’s structure but with identical pricing, which surprised many consumers. This effectively devalued the previous model, prompting me to trade in my old DJI drone for the new one. The following table outlines the pricing details:
| Version | Price (CNY) | Key Inclusions |
|---|---|---|
| RC Remote Controller Version | 13,888 | Basic setup with standard remote |
| RC Fly More Combo | 17,688 | Additional batteries and accessories |
| RC Pro Fly More Combo | 21,988 | High-end remote with 5.5-inch screen |
| Master Combo | 31,688 | Premium package with all extras |
The remote controller compatibility is a key aspect; DJI UAVs generally use universal remotes that pair via frequency matching. The DJI RC Pro, with its 5.5-inch 1000-nit screen, is highly sought after, but shortages occurred during the launch. I retained my existing unit, as upgrading would have been challenging due to limited stock. The after-sales service is exemplary; DJI offers online repair requests with free shipping via SF Express, and their customer support (400-700-0303) is responsive and helpful. This level of service reinforces the reliability of DJI drones in the global market.
In conclusion, the DJI Mavic 3 Pro represents a significant advancement in consumer UAV technology. Its triple-camera system provides unmatched versatility, and the improvements in image quality, especially in the telephoto lens, are noticeable. While there are minor drawbacks, such as storage demands and occasional video stuttering, the overall experience is overwhelmingly positive. As a user, I find that this DJI drone enhances creative possibilities, much like what one might expect from specialized equipment like the DJI FPV, but with the added benefit of a multi-lens setup. The pricing strategy and strong售后服务 make it a compelling choice for both enthusiasts and professionals. Ultimately, the Mavic 3 Pro solidifies DJI’s position as a leader in the UAV industry, and I highly recommend it to anyone looking to elevate their aerial photography.
Throughout my testing, I applied various mathematical models to optimize settings. For instance, the depth of field (DOF) for each camera can be calculated using $$ \text{DOF} = \frac{2 N c f^2}{s^2} $$ where \( N \) is the aperture number, \( c \) is the circle of confusion, \( f \) is the focal length, and \( s \) is the subject distance. This helped me achieve precise focus in different scenarios. Additionally, the battery life, though not covered in detail here, follows a decay function $$ B(t) = B_0 e^{-kt} $$ where \( B_0 \) is the initial capacity and \( k \) is a constant, ensuring I planned my shoots efficiently. These technical insights, combined with the practical features of the DJI UAV, make the Mavic 3 Pro a powerhouse for innovation.